During
Christmas break, I wanted to develop python software or package following
industry practice. So I had started a data science project, machine learning
deployment, and python package. I have not finished the first two but finished
the latter.
It is an
open source python package that resizes images. You can install it from PyPI
by:
pip install
imgresizer
This
package takes a json input which specifies necessary settings and resizes
images by parallel. The reason I use a JSON input is I aimed to use this
package for web development. Here is GitHub:
Working on
this project, I have learned to structure python project, used Travis CI for
continuous integration, used pytest to write unit and coverage tests, uploaded
the package to pypi, and studied a lot about speeding up python and
parallelising python. I would say it is a lot.
Have a look
and let me know what you think. Personally, I think I would re-factor it again
and implement pooling to increase its efficiency even more.
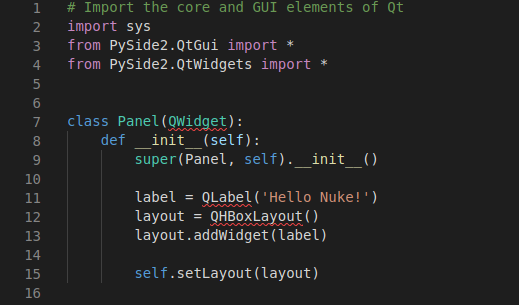
A while ago I had spent a couple of hours to set up my Nuke scripting environment. There were only a few things that need to be taken care of. Namely, those were setting up python environment, setting PySide2 working (no kidding), and using Nuke as a module. Yeah, it seems easy; however, it managed to waste a good amount of my time. So here I will share how I set up Nuke scripting environment.
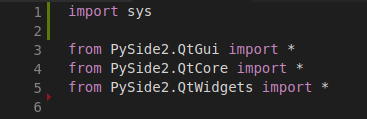
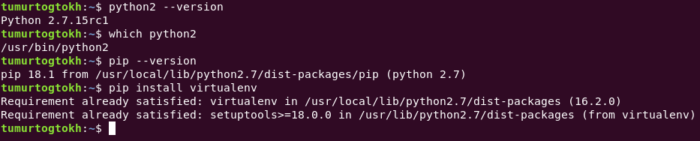
Firstly, I always create a new virtual environment whenever I work on a new project. So I created a python2 virtual environment dedicated to Nuke, Maya and Houdini scripting. I found it helpful and dependable when some random incompatibility error occurs I know where to look and how to fix them. Then I installed PySide2. According to VFXPlatform, PySide2 started being industry standard from 2016. Since then, I believe that the visual effects industry completely shifted to it. However, some old tutorials on the internet use PySide and give an error regarding QtWidget. In PySide, QtWidget can be imported from QtGui class. But that is not the case for PySide2. Here you need to import PySide2.QtWidgets.
Another issue related to PySide2 was rather funny. Somehow VSCode was not recognising PySide2 objects in its editor. It imported a whole PySide2 module and run a code successfully. Unfortunately, it was saying PySide2 objects are not imported and showed undefined-variable error everywhere. Well, no one likes to see red underlines below their code. Do they?
As I could not think of any solution since the code works and PySide2 installed correctly, I switched to PyCharm community edition. I think it is only for python2 and hope VSCode will be fixed after a few updates. For now, I use whatever gets a job done.
Next fun task was using Nuke as a module. We need auto-complete and function annotations when we develop a script for Nuke. There comes a very helpful script: Nuke-Stubs-Generator.
It simply generates stubs for us to use as nuke.py file. Place it in your home/.nuke directory and run Nuke. Then run this command from Nuke script editor to generate nuke.py:
Now I can put it anywhere you need. Realistically, I would have a bunch of scripts and tools that I am working on. But that implies that I would end up putting it in multiple places in order to use external IDE for writing scripts for Nuke. You know that it is bad practice.
To solve it, I put nuke.py inside site-packages of my virtual environment. Since I was using virtualenvwrapper, I put it here:
That way I do not have to copy it in a few places and can import nuke globally anywhere I would like to use. Of course, I have to activate the virtual environment in order to import it.
So that basically
wraps up how I set up Nuke scripting environment. Now it is time to
write cool GUIs and pipeline scripts.
Nowadays Python is everywhere – academics, data science, machine learning, enterprise application, web application, scripting you name it python is everywhere. Whatever you do, python is there to help you or give you a headache. Let us say, you have learnt python programming and ready to use to develop applications that wow your future employers and make your future glorious. Surely, as that is great, you jump into coding python scrips and eventually start installing python packages. From there one follows a dangerous path into developer’s nightmare.
Package installation may lead to having incompatibility issues or make other application unworkable. And you may discover that your code does not work on some machines, while your code just works flawlessly on your local machine. Even though it gives a classic excuse for not writing good code, we, as developers, should make sure our code works everywhere. So what is a problem here? Python environment.
So,
not to have a daily nightmare about incompatibility issues,
individual python environment needs to be created for a project. A
virtual environment is a bunch of scripts and directories that can
run python isolated. By using a virtual environment, each python
projects can have its own dependencies regardless of other project
and system python environment. Here I will write about how to create
and use virtual environment in python2 and python3. I will use
virualenv for python2 and venv, virtualenvwrapper, and conda for
python3.
Starting
with python2, you need to install virtualenv package.
See,
I already have installed it. After installing it, you can see its
commands by:
virtualenv
-h
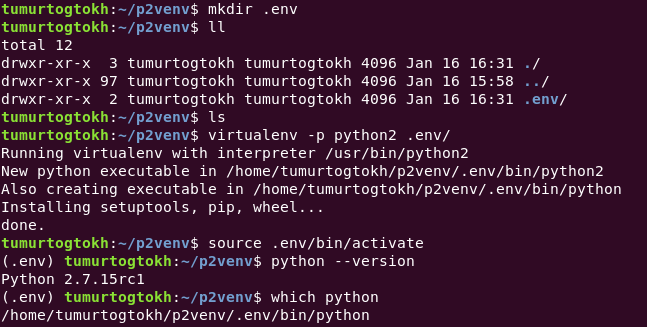
We do not need to use most of those. To create a virtual environment, we use virtualenv [options] destination. Specifically, call
Obviously, we can create a python3 virtual environment by –python=python3 assuming you have python3 installed on your machine. This command creates an isolated virtual environment as same as a given python path. Instead of using python2 and python3, we can give a direct path.
Once a virtual environment is created, we can use it by calling:
source path/to/virtual/environment/bin/activate
And calling deactivate when a virtual environment is activated, leaves the virtual environment. On python3, it has venv package as default for a virtual environment. To use it, we just need to call
python3 -m venv path/to/virtual/environment
Everything else is same. What we have done is that we created a fresh python environment and copied dependencies to a specified directory. There we can install any packages without affecting other environment and local python by activating this environment. That is an absolute breeze.
However,
we do not want to push it git repository but we do need to have a way
of knowing required dependencies since some of us work on a project
from different machines. I, for one, work from three different
machines with windows and linux system.
One way to solve this problem is to create a folder for the virtual environment and ignore it for git. That way we can work on a project from different machines and on different os. We just have to keep a track of required dependencies. Using pip, we can save information of installed dependencies into a file and install those dependencies on a different environment when need to. Pip freeze command shows packages installed on the python environment. We need to save it to a file. It is a good practice to save it as ‘requirement.txt’. Later, on a different machine, we install required dependencies by using
pip install -r requirement.txt
Now
we are in a very convenient position where we can work on a python
project with any machines in any os. But what is the .env on my
terminal and what about the occupied disk space of virtual
environment? Obviously, those virtual environment files are
necessary. However, when you have a number of completed python
project and you want to release some spaces for some reason, would
you check each projects and delete those files manually? Or wouldn’t
it be easier if all virtual environment files are in one directory?
And .env is a directory name where virtual environment is created.
Ok, cool. But wouldn’t it be more convenient to see an actual
python project name when the virtual environment is being used?
Virtual environment wrapper
To solve those minor inconveniences, we can use virtualenvwrapper package. Install this package with:
pip install virtualenvwrapper
after
installing it, we need to activate its shell functions and create an
environment variable that indicates a location of virtual
environments. By running which virtualenvwrapper.sh, we get a path of
its shell functions. We need to add it to shell startup. Since I am
using ubuntu, I added it to ~/.bashrc. I also created environment
variable for a location where I save virtual environments. So far, I
added those lines to .bashrc:
So
now, you can create a virtual environment with:
mkvirtualenv -p python3 name/of/virtual/env
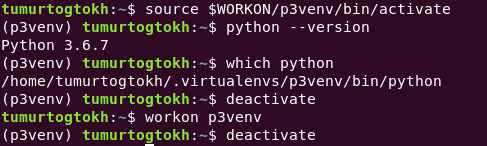
And activate it and use it. Also, virtualenvwrapper provides a few useful shell functions. One of those is workon. See, it makes life easier. To see a complete guide, visit this page.
p3venv is a name of env
Because it saves all files of every virtual environment created, it is easy to delete those if need to. And seeing the project name on terminal is pretty cool actually. That is it for creating and managing virtual environments using pip.
Using Conda
Now let’s see how to do it with conda. Conda is a package management system for Python, R, Lua, Scala, Java, JavaScript, and Fortran. Widely used in academic fields, we may know it by Anaconda. And people claim that conda is better tool for data science projects (I don’t know why. Read it here). Anaconda distribution is used by universities and it has its own GUI environment management tool with its navigator. However, not every developer loves to use gui-based tools, right?
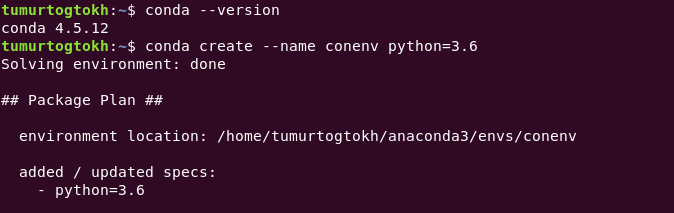
Assuming conda is installed (if not install it from here), to create a conda environment
conda create --name name/of/env python=3.x
and activate the created environment with
conda activate name/of/env
Conda creates virtual environment and stores all related files to its installation location. Which makes it easy to manage. To see all conda environments, we can call:
conda info --envs
To remove particular environment, we call
conda remove -- name name/of/env -- all
Conda stores all environment names inside environment.txt in home directory/.conda folder. A content of it is same as conda info –envs command. On the other hand, all executables and packages are stored inside anaconda installation directory/envs folder. It is useful to know it since anaconda stores GBs of files (unbelievable, right?).
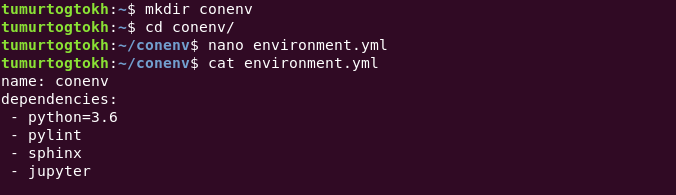
It is not the only way to create a conda virtual environment. We can save required information inside a yml file and use it to create conda environment. Generally, people create environment.yml and put python info, environment name, and dependencies there. With that yml file, we can create a virtual environment easier by calling
conda env create -f environment.yml
Updating environment.yml is easy, just need to write what needs to put there and call
conda env update -f environment.yml
You can confirm it by conda list command. I know it prints a tremendous amount of packages. For love of the god, I hope conda does use all of them effectively. To distribute our project, we need to save dependencies information. Calling conda env export shows you all required information to save. We need to copy and paste it into requirement.yml (for ubuntu, simply run conda env export > environment.yml).
So
that is it. Now I hope it becomes easier to manage python virtual
environment. From here, we can write our application with ease and
eventually package it and distribute it. That is another story to
tell some other time.