This year’s Houdini HIVE was basically hyped around USD. Think about it – a whole day of presentation and tutorials for USD. That may suggest SideFX is serious about putting USD into use. But what is this technology anyway? Don’t we have an Alembic already?
Yes, Alembic let us speak between 3D applications in one format and pass somewhat universal data between applications. But after using it for a while, it would appear that there are a few magic options to choose when exporting/importing and some commands or settings magically work or don’t work. Also, remember it is just a simple bake. Meaning, it is often required to generate new alembic data to pass assets between artists or departments. For instance, say if a lighting artist wants to have a look at earlier passes of alembic files, he or she would have to import a new alembic file from a creature, effects, or animation department. Usually, they do not need to see earlier works of other departments but who knows what happens during production.
In my opinion, to overcome this struggle, USD allows the pipeline to pass just one data between departments. Thus, anyone can peek at earlier passes of precursor departments with a simple button click. Another thing to note is that USD can store variants of assets in itself. This is very desirable since production almost always need variants of an asset. For example, say, we have Smart Hulk. We would have its default model as naked Hulk. But in the movie, he smashes a bunch of stuff with his pant, takes a selfie with glass and sweater, time travels in Avengers suite, travels to Isengard people at the back of a truck, chills in Avengers’s building with compy clothing, wears Thanos’s glove, and attends to Iron man’ funeral with a suite. Each of them would need a model and bake. With Alembic, if we are to pass them, each variant would need to end up as a new bake. On the other hand, USD simply passes all of them together. This would allow artists to load USD and switch between variants with a simple button click (at least in Houdini).
Well, theoretically, that seems nice. So I gave a go at using USD in my personal pipeline. It is nothing fancy as it mostly aimed at ingesting a static alembic and creating a scene graph of USD with its variants using Python in Houdini. Okay, but what is a scene graph of USD?
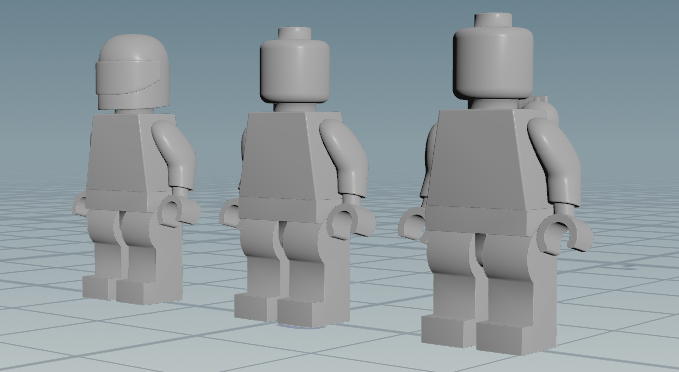
LOP scene graph
That is terminology SideFX decided to use describing the management of assets in a scene. Above I only have one asset i.e LegoA represented as a group. Inside this group, I have LegoA_geo component that indicates this asset is for modellers and it is static. As it is just convention, you could have LegoA_mat for texturing, LegoA_anim for animation, LegoA_layout for layout, LegoA_fx for effects, and so on. Each of them would be indicated as components in LegoA asset group. Then variants of the component are marked as subcomponent as you may already have guessed. My LegoA_geo component has three variants including its default: LegoA_backpack, LegoA_helmet, LegoA_default. On Variants tab, Houdini shows I currently activated default variant; so, I am using LegoA_default subcomponent. For completeness of the example, I have those three variants. In this alembic, a base model is put in a group and helmet and backpack are in separate groups.
Three variants
As I am in Houdini, it would be wise to create an HDA and wrap its functionalities. So I created a network on nodes in a lop to wrap up and planned to expose a path to alembic file, group in alembic to use for variant and a variant name for USD. A rough network created by my HDA looks like below.
LOP network created by script
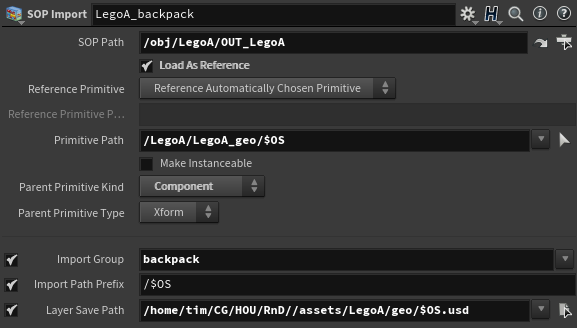
At first, it will import alembics from sop into lop and merge them to pass down the network. While a sop import node sounds doing just importing data, in fact, it actually builds a ground structure of a scene graph. In its Primitive Path, I set up a scene tree path of the sop. As it can be seen, it will put a sop into LegoA/LegoA_geo/LegoA_backpack ($OS means a node name in Houdini) and its parent will be Component type. By default, a sop is imported as component type so LegoA_backpack is component, not subcomponent at this node. Another important thing to note is that we have to choose where we want to save USD of this leaf of the scene graph in Layer Save Path. I am not sure why it is required but without it, USD rop may fail depending on its export settings.
SOP Import node
As I
ended with components after merging those leaves, I put configure
primitive node to set them subcomponent and put another below to set
the default path to group name – LegoA. After this, a scene graph
without any variants is done. To add variants, I added prune nodes to
separate variants and added null node to name the variants then
passed them to an add variant node. Now USD rop node can be added to
export ingested alembic as USD. As a cherry, I added set variant node
to pick and see variants. That is how artists can switch variants
with a simple click.
Just writing those would not make total sense. Here is an HDA with its python script. As proof of concept, it does something cool. But as a tool, it just imports alembic files and prepares them to use in a land of USD and Solaris. From this point, I am keen to try it on an environment, set dressing or scene assemble work where, I think, layering and using variants are such importance. However, I still have not watched all HIVE videos though. After watching them or gaining more experience with USD and Houdini, I will definitely change this HDA. For now, it is just a cute toy or something.
Continuing on a scene graph, if we are about to add more components, say material, another set of nodes should be added. The material asset would be added as another component and could be connected after setting imported sops as subcomponents. I have tried creating LegoA_mat component with assign materials node and reference nodes. Assign materials node obviously are needed to apply textures to geo variants and reference node is used to connect sop import and assign material nodes. To bring bake assets, another sop import node should be created. This process is as same as what I outlined above. Or I hope that is. Then when a different asset is imported, it would end up as another group. Inside this group, another set of components and subcomponents will be built in a same way.
Still, a reason why sop import nodes need to set an intermediate USD path is not crystal clear to me. Advantage of having intermediate USD files is that we could have different USD files for each subcomponent. And those intermediate USD files will be saved when USD rop runs. If we have more components, those would have different USD files too. From my perspective, this is extra care which needs close attention in the pipeline.
On a
very usual Sunday afternoon, I was sitting on my couch and sipping a
tea while wondering what to do during the pandemic lockdown. Of
course, it is not about going out and running amok around the city,
rather it is about prioritising my pet projects and working on them
since I am fortunate enough to work remotely at a company that cares
about its employees. For that, I love my job and respect my employer.
Anyhow,
without dozing on my couch, I pulled off my old laptop and started
pushing my pet projects’ code. All well, all good, all have been
pushed seamlessly until git decided to complain to me. Well, damn you
git I thought like every other developer in the universe. But what
was the error git threw?
That
makes sense. I forgot to ignore CSV files or not to add any files in
a data folder. Stupid me forgot this repo is a machine learning
project that uses data intensively. I had other large files such as
tar.gz, jpeg, pt in my repo that I would want to keep track.
Normally, I put them in the data directory and write a manifest which
keeps track of what is inside the data folder. Later, from a
different machine, I would use this manifest to download the files
again. Or I could use a file server for such huge data storage.
Efficient, or not efficient is subjective here, but a point is git
could do better to support tracking files.
So
smart folks at GitHub saw this issue and has decided to support it.
Their solution is to use https://git-lfs.github.com/.
They decided to store files in GitHub or GitHub enterprise server and
point it to our git repo so that we could track our files like our
code. To use this, you need to install this first:
Upon
completing those two installs, you are ready to use git lfs. Okay,
how do we use it then?
Firstly,
it needs to know which or what type of files you want to track. It
stores this information inside .gitattrubures in your repo. To tell
it which type of file to track, you can run
git lfs track "*.csv"
or
you can edit .gitattrubutes yourself. After running the above, you
will see this inside .gitattribute:
*.csv filter=lfs diff=lfs merge=lfs -text
Now
you just need to push .gitattrubtes so git knows that it should use
git lfs on those files. After pushing this, adding and pushing files
is as same as usual git workflow. Finally, during pushing your
commits, you will see git lfs is uploading files and tracking them.
That is one less pain for developers, folks!
Well, that is a bit of a surprise. Isn’t it? But there is 1GB limit put by Github. Even so, it is nice to dump files in repo and track it from different machines.
Remember the last episode of Game of Thrones? By the last, I meant not the 6th episode which made no sense and nearly destroyed the story of the whole show, but 3rd episode – The Long Night. Surely, most of us were absolutely hyped for the Long night episode. For me, I was mostly looking for a battle between a dead dragon and two other dragons also how the Dothraki army would fight against the dead.
The Dothraki was so fearsome and terrorized everyone throughout 8 seasons. They were living legends and were so famous that someone tells stories about them to scare people. Also, their army was the biggest ever Dothraki army. Then the dead came and massacred them with a blink of an eye. (Talk about a disappointment!)
Anyhow, there was one shot that was appealing to me. The shot was, you know, a witch came to the army and ignite a fire on their blade. At that moment, I thought it would be painful to create such fire effects for a whole army. There are hundreds of them and each of them potentially moves slightly, because they were sitting on a horse, and, of course, it is fire simulation. How would you create and simulate hundreds of fire blade efficiently? I decided to give a try. Here is my process from a TD view.
Firstly, I created a fire simulation on Maya Fluid. That hero fire fx would be sent to a lighting and rendering artist while I figure out how to simulate hundreds of them. Obviously, I would not want to manually work on them and would assume a fire emitter object and fluid fx will change when feedback comes. With those assumptions, I started coding in Python.
The first issue is creating clones of hero fx. Here I assumed that I would have animated objects from layout and animation artists that could be emitters. That could be anything – mesh, curve, and shape etc. Because of this, I abstracted a type of the object and wrote a function to create a clone of hero fx for each animated objects.
def duplicate_fluids(fluid, obj):
    """
    Create fluid containers

    :param fluid:  a source fluid name
    :param obj: an emitter object type
    """
    # Duplicate a fluild container
    for obj in cmds.ls(type=obj):
        cmds.duplicate(fluid)
    cmds.delete(fluid)
Then those fluid containers need to be transformed and linked to emitters. MatchTransform method and a translation were used for this task. Once each fluid containers moved to a position I wanted, an emitter created and linked to it.
def create_fluid_on_emitters(emit_objects, fluids, obj, y_offset, rate=100, her=1, der=1):
    """
    Create fluid containers on an emitter and move container. Also, set some attributes of an emitter

    :param emit_objects: objects emit from
    :param fluids: fluid containers
    :param obj: emit object type
    :param y_offset: move y of a container
    :param rate: emitter rate
    :param her: heatEmissionRate
    :param der: densityEmissionRate
    """
    for i in range(len(cmds.ls(type=obj))):
        # Moving up a fluid container
        cmds.matchTransform(fluids[i], emit_objects[i])
        cmds.select(fluids[i])
        cmds.move(y_offset, y=True)

        # Create an emitter and connect it to fluid container
        emitter = cmds.fluidEmitter(emit_objects[i], type='surface', rate=rate, her=her, der=der)
        cmds.connectDynamic(fluids[i], em=emitter[i])
Now I am ready to cache them. However, I still need to select them. Instead of selecting them from a maya outline, I wrote a function to accomplish it. The function simply checks all ‘transform’ nodes whether their name has ‘fluid’ and a substring from a start is shorter than a given number. Since there are so many other unnecessary nodes with ‘fluid’ in it, I needed to find nodes like ‘fluid1’, ‘fluid12’, and ‘fluid3433’.
def select_fluid_containers(count):
    """
    Select all fluid containers

    :param count: a number of digits (fluidXXX)
    :return: fluid containers
    """
    # Select fuild containers
    return cmds.ls([f for f in cmds.ls(type='transform') if (('fluid' in f) and (len(f) <= len('fluid') + count))])
With those functions, I can create any number of fire fx and cache them without touching anything. Lastly, on the original shot, there was a slight offset for fire ignition. With a camera pan, it did add suspension to the screen. To assist this, I wrote a function to change a start frame of fluid fx. Now I simply need to use the function in a loop to set a slight offset. It changes start frame of all fluid containers one by one, 5 by 5, or any number in a loop.
def set_animation_start(fluid, start):
    """
    Set startFrame of a given fuild

    :param fluid: fluid container
    :param start: startFrame
    """
    cmds.select(fluid)
    cmds.setAttr(cmds.listRelatives()[0] + '.startFrame', start)
Finally,
I can package those functions in a python script, add some animation
or write a guide creating an offset animation, and send it along with
hero fx to an animation team.
In the future, I could have a different fire fluid fx to choose from. For this case, I will send a list of fire fx to the ‘duplicate_fluids’ function and randomly select from them for each animated objects. And, offset may need other work such as adding a bit randomness. That will be adding a random number on the start frame when using the ‘set_animation_start’ function. Furthermore, when feedback comes or hero fire fx is changed, I could pass a dictionary with necessary attributes to the functions.
Thanks
to Python and Maya. Creating hundreds of fire turned out to be not so
hard.
During
the last weekend, I had tried to set up maya python environment. You
know, developing python scripts using IDE and testing it with maya
script editor is a bit painful. Ideally, you would need to have IDE
that supports auto-complete and maya introspection.
After
googling a bit, I found out that Autodesk provides python interpreter
for maya. It is located in ~/usr/autodesk/maya2018/bin/mayapy, for my
case. This python interpreter loads all maya modules automatically,
which is what I want. Now I just need to use this interpreter for my
IDE. As for IDE, I typically use PyCharm for any CG scripts
development. It lets you set its python interpreter. Using this
feature, we can choose mayapy as a python interpreter.
To do this, firstly, I created a PyCharm project for Maya python script development. When you create a new project, PyCharm asks you to choose a python interpreter. You would need to choose mayapy for it. Here you can create a new interpreter or choose an existing one. Either way, you need to set it as a system interpreter. So select a system interpreter and locate your mayapy. Since we are using a system interpreter, you need to authorise it. That is it. You are ready to develop maya python scripts with PyCharm.
Once
the project was set up, PyCharm may complain about “python
packaging tools not found”. It did for my case. It is not something
you need to worry about. Because, autodesk did not include some
libraries that python environment needs i.e as pip, PyCharm is
notifying it. It is also the reason you need to set your python
interpreter as a system interpreter. If you choose it as either
virtualenv or conda, PyCharm would fail to set a python interpreter
for the project since virtualenv and conda are not included in a
python interpreter that autodesk provided.
However, I think that it would not be an issue for us. Now you can import maya and pymel modules. See codes below.
import sys
import maya.cmds as cmds
import pymel.core as pmc
print sys.modules.keys()
It
shows modules imported. From there, we can see maya and pymel are
loaded. You can also initialise maya and run it. To do that, we need
to import maya and initialise it.
It may take a while since it is loading maya. But when you do import it, you can see all other modules that maya need are imported.
Now let us get auto-completion working. Note that I am using PyCharm 2019.1 Community Edition and Maya 2018. Firstly, get DevKit from here: https://www.autodesk.com/developer-network/platform-technologies/maya Then install it on your maya root. For my case, my maya root is /usr/autodesk/maya2018. To install devkit, extract the zip you downloaded then copy devkit and mkspecs folders to you maya root. Leave lib and include folders as it is. If you copy those folders to your maya root, you will get some symbol look up errors and your maya won’t run. Believe me I did copy those and got those errors :)) .
Once you copied those folders, run your Pycharm and open its settings. Under your project interpreter settings, look for a gear icon next to your project interpreter location. Click into that and click Show all. See a picture below:
Select your mayapy and click at an icon at the bottom of the right-side panel. You will see all python modules loaded for you there. You need to add another library from devkit here and remove one path. Click add button and point to your maya root/devkit/other/pymel/extras/completion/py directory. Then remove your maya bin/lib/python2.7/site-packages directory. If in doubt, see a picture below.
As a cherry on the cake, it would be nice if maya knows the directory of scripts that I am developing. There are two ways to accomplish it: import it in userSetup.py or set environment variable. Or you can edit system environment variable if you want to go extreme.
In my case, I chose to use userSetup.py. Since I am using Linux, I needed to create userSetup.py inside ~/maya/2018/scripts. A content of userSetup.py is simply:
During
Christmas break, I wanted to develop python software or package following
industry practice. So I had started a data science project, machine learning
deployment, and python package. I have not finished the first two but finished
the latter.
It is an
open source python package that resizes images. You can install it from PyPI
by:
pip install
imgresizer
This
package takes a json input which specifies necessary settings and resizes
images by parallel. The reason I use a JSON input is I aimed to use this
package for web development. Here is GitHub:
Working on
this project, I have learned to structure python project, used Travis CI for
continuous integration, used pytest to write unit and coverage tests, uploaded
the package to pypi, and studied a lot about speeding up python and
parallelising python. I would say it is a lot.
Have a look
and let me know what you think. Personally, I think I would re-factor it again
and implement pooling to increase its efficiency even more.
A while ago I had spent a couple of hours to set up my Nuke scripting environment. There were only a few things that need to be taken care of. Namely, those were setting up python environment, setting PySide2 working (no kidding), and using Nuke as a module. Yeah, it seems easy; however, it managed to waste a good amount of my time. So here I will share how I set up Nuke scripting environment.
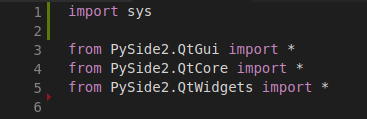
Firstly, I always create a new virtual environment whenever I work on a new project. So I created a python2 virtual environment dedicated to Nuke, Maya and Houdini scripting. I found it helpful and dependable when some random incompatibility error occurs I know where to look and how to fix them. Then I installed PySide2. According to VFXPlatform, PySide2 started being industry standard from 2016. Since then, I believe that the visual effects industry completely shifted to it. However, some old tutorials on the internet use PySide and give an error regarding QtWidget. In PySide, QtWidget can be imported from QtGui class. But that is not the case for PySide2. Here you need to import PySide2.QtWidgets.
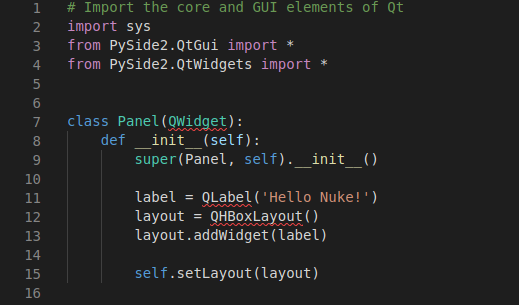
Another issue related to PySide2 was rather funny. Somehow VSCode was not recognising PySide2 objects in its editor. It imported a whole PySide2 module and run a code successfully. Unfortunately, it was saying PySide2 objects are not imported and showed undefined-variable error everywhere. Well, no one likes to see red underlines below their code. Do they?
As I could not think of any solution since the code works and PySide2 installed correctly, I switched to PyCharm community edition. I think it is only for python2 and hope VSCode will be fixed after a few updates. For now, I use whatever gets a job done.
Next fun task was using Nuke as a module. We need auto-complete and function annotations when we develop a script for Nuke. There comes a very helpful script: Nuke-Stubs-Generator.
It simply generates stubs for us to use as nuke.py file. Place it in your home/.nuke directory and run Nuke. Then run this command from Nuke script editor to generate nuke.py:
Now I can put it anywhere you need. Realistically, I would have a bunch of scripts and tools that I am working on. But that implies that I would end up putting it in multiple places in order to use external IDE for writing scripts for Nuke. You know that it is bad practice.
To solve it, I put nuke.py inside site-packages of my virtual environment. Since I was using virtualenvwrapper, I put it here:
That way I do not have to copy it in a few places and can import nuke globally anywhere I would like to use. Of course, I have to activate the virtual environment in order to import it.
So that basically
wraps up how I set up Nuke scripting environment. Now it is time to
write cool GUIs and pipeline scripts.
Nowadays Python is everywhere – academics, data science, machine learning, enterprise application, web application, scripting you name it python is everywhere. Whatever you do, python is there to help you or give you a headache. Let us say, you have learnt python programming and ready to use to develop applications that wow your future employers and make your future glorious. Surely, as that is great, you jump into coding python scrips and eventually start installing python packages. From there one follows a dangerous path into developer’s nightmare.
Package installation may lead to having incompatibility issues or make other application unworkable. And you may discover that your code does not work on some machines, while your code just works flawlessly on your local machine. Even though it gives a classic excuse for not writing good code, we, as developers, should make sure our code works everywhere. So what is a problem here? Python environment.
So,
not to have a daily nightmare about incompatibility issues,
individual python environment needs to be created for a project. A
virtual environment is a bunch of scripts and directories that can
run python isolated. By using a virtual environment, each python
projects can have its own dependencies regardless of other project
and system python environment. Here I will write about how to create
and use virtual environment in python2 and python3. I will use
virualenv for python2 and venv, virtualenvwrapper, and conda for
python3.
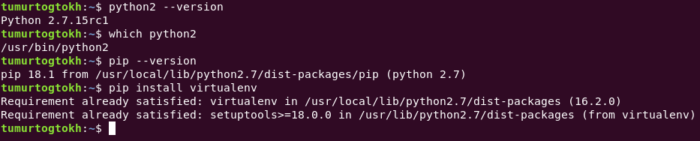
Starting
with python2, you need to install virtualenv package.
See,
I already have installed it. After installing it, you can see its
commands by:
virtualenv
-h
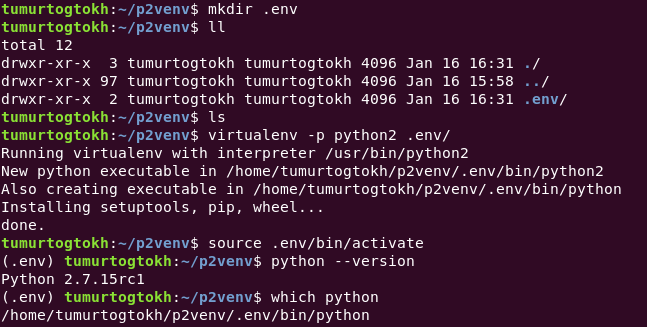
We do not need to use most of those. To create a virtual environment, we use virtualenv [options] destination. Specifically, call
Obviously, we can create a python3 virtual environment by –python=python3 assuming you have python3 installed on your machine. This command creates an isolated virtual environment as same as a given python path. Instead of using python2 and python3, we can give a direct path.
Once a virtual environment is created, we can use it by calling:
source path/to/virtual/environment/bin/activate
And calling deactivate when a virtual environment is activated, leaves the virtual environment. On python3, it has venv package as default for a virtual environment. To use it, we just need to call
python3 -m venv path/to/virtual/environment
Everything else is same. What we have done is that we created a fresh python environment and copied dependencies to a specified directory. There we can install any packages without affecting other environment and local python by activating this environment. That is an absolute breeze.
However,
we do not want to push it git repository but we do need to have a way
of knowing required dependencies since some of us work on a project
from different machines. I, for one, work from three different
machines with windows and linux system.
One way to solve this problem is to create a folder for the virtual environment and ignore it for git. That way we can work on a project from different machines and on different os. We just have to keep a track of required dependencies. Using pip, we can save information of installed dependencies into a file and install those dependencies on a different environment when need to. Pip freeze command shows packages installed on the python environment. We need to save it to a file. It is a good practice to save it as ‘requirement.txt’. Later, on a different machine, we install required dependencies by using
pip install -r requirement.txt
Now
we are in a very convenient position where we can work on a python
project with any machines in any os. But what is the .env on my
terminal and what about the occupied disk space of virtual
environment? Obviously, those virtual environment files are
necessary. However, when you have a number of completed python
project and you want to release some spaces for some reason, would
you check each projects and delete those files manually? Or wouldn’t
it be easier if all virtual environment files are in one directory?
And .env is a directory name where virtual environment is created.
Ok, cool. But wouldn’t it be more convenient to see an actual
python project name when the virtual environment is being used?
Virtual environment wrapper
To solve those minor inconveniences, we can use virtualenvwrapper package. Install this package with:
pip install virtualenvwrapper
after
installing it, we need to activate its shell functions and create an
environment variable that indicates a location of virtual
environments. By running which virtualenvwrapper.sh, we get a path of
its shell functions. We need to add it to shell startup. Since I am
using ubuntu, I added it to ~/.bashrc. I also created environment
variable for a location where I save virtual environments. So far, I
added those lines to .bashrc:
So
now, you can create a virtual environment with:
mkvirtualenv -p python3 name/of/virtual/env
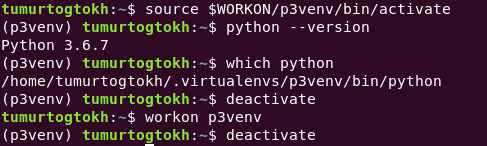
And activate it and use it. Also, virtualenvwrapper provides a few useful shell functions. One of those is workon. See, it makes life easier. To see a complete guide, visit this page.
p3venv is a name of env
Because it saves all files of every virtual environment created, it is easy to delete those if need to. And seeing the project name on terminal is pretty cool actually. That is it for creating and managing virtual environments using pip.
Using Conda
Now let’s see how to do it with conda. Conda is a package management system for Python, R, Lua, Scala, Java, JavaScript, and Fortran. Widely used in academic fields, we may know it by Anaconda. And people claim that conda is better tool for data science projects (I don’t know why. Read it here). Anaconda distribution is used by universities and it has its own GUI environment management tool with its navigator. However, not every developer loves to use gui-based tools, right?
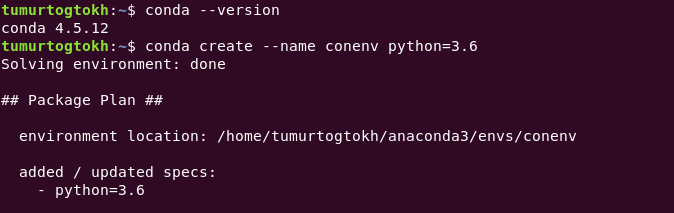
Assuming conda is installed (if not install it from here), to create a conda environment
conda create --name name/of/env python=3.x
and activate the created environment with
conda activate name/of/env
Conda creates virtual environment and stores all related files to its installation location. Which makes it easy to manage. To see all conda environments, we can call:
conda info --envs
To remove particular environment, we call
conda remove -- name name/of/env -- all
Conda stores all environment names inside environment.txt in home directory/.conda folder. A content of it is same as conda info –envs command. On the other hand, all executables and packages are stored inside anaconda installation directory/envs folder. It is useful to know it since anaconda stores GBs of files (unbelievable, right?).
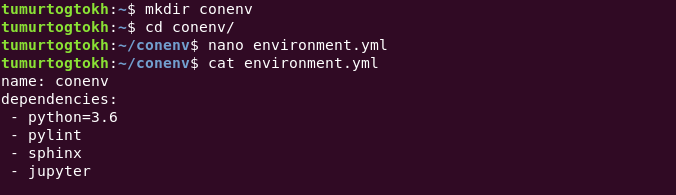
It is not the only way to create a conda virtual environment. We can save required information inside a yml file and use it to create conda environment. Generally, people create environment.yml and put python info, environment name, and dependencies there. With that yml file, we can create a virtual environment easier by calling
conda env create -f environment.yml
Updating environment.yml is easy, just need to write what needs to put there and call
conda env update -f environment.yml
You can confirm it by conda list command. I know it prints a tremendous amount of packages. For love of the god, I hope conda does use all of them effectively. To distribute our project, we need to save dependencies information. Calling conda env export shows you all required information to save. We need to copy and paste it into requirement.yml (for ubuntu, simply run conda env export > environment.yml).
So
that is it. Now I hope it becomes easier to manage python virtual
environment. From here, we can write our application with ease and
eventually package it and distribute it. That is another story to
tell some other time.